When it comes to making gummy candy at home, there is a common problem of foam or bubbles forming on the (usually outer) surface of the gummy. While this has no effect on the overall taste, it is visually unappealing to some. Excessive foaming can even affect the chewing texture of the gummy.
This is usually caused by aerating the gummy mixture too much (usually due to aggressive stirring or whisking). So how do you prevent foaming and bubbles from foaming while making gummies?
The best way to avoid foaming when making gummies is to avoid vigorously stirring the gummy mixture. Stirring or whisking too fast introduces unnecessary aeration into the gummy.
Foaming also forms when broken gelatin has not been properly dissolved. If the gelatin still has not fully broken down after slowly heating and stirring, you can strain out the clumps.
1. Do not whisk or stir too vigorously
Whisking, especially aggressive whisking, is the primary cause of foaming and bubbling in making gummy candy. Whisking just adds too much air into the equation. As tempting as it is to whisk fast, save it for your meringues. You don’t want fluffiness in gummy candy.
If you’re using gelatin, gently bloom it before using low-med heat and stir it slowly if you need to. It doesn’t take much to dissolve gelatin properly, just a bit of extra time.
Better yet, don’t use a whisk at all. A spoon to stir the ingredients should be enough.
2. Pipe instead of pouring into molds

When pouring a gummy mixture into molds, there is a lot of chance for air to get in, even with a spouted cup. Not only that, it’s hard to not make a mess.
Piping in the gummy mixture through a turkey baster or something similar can fix common over-aerations. Condiment bottles and syringes are other effective tools that come to mind.
I prefer using condiment bottles as they have the largest volume. All the foam and bubbles also rise to the top, making it easy to scrape off.
3. Use a blow torch, heat gun, or hair dryer
Be careful not to blast the molds; you only want to heat the exterior of the gummies until the foaming or bubbles fade away. Lightly going over the gummies should pop most of the bubbles.
Doing this while tapping the mold should be enough to fix most gummies.
4. When melting together ingredients, don’t bring to bubble/boil
You don’t need a lot of heat to incorporate all the ingredients together. Additionally, don’t stir in ingredients too aggressively, as this will introduce a lot of air into the mixture.
When blooming gelatin (if you’re using gelatin), low-med heat is sufficient with a light amount of stirring. You could even microwave the gelatin in short bursts while stirring in between.
Bloom your gelatin before adding it to hot ingredients. Adding gelatin to hot liquid will cause the gelatin to clump together more often.
If you notice foaming or white streaking before pouring into molds, simply scoop it off with the back of a ladle before pouring.
5. Tap the mold on a hard surface
Before the gummy mixture starts to settle, tap the mold on a surface. Note that if your gummy is extra foamy, this step alone won’t be enough. You’ll have to use a combination of previous methods along with tapping to clear the bubbles.
You might notice some bubbles rising to the surface, then use a toothpick to pop them.
6. Use very cold water to separate (bloom) gelatin
When using gelatin, it is important to use cold water to help break it down and dissolve the gelatin. Stir in the gelatin slowly until all the gelatin is absorbed into the water.
Do not turn on the heat until all the gelatin has been incorporated into the water. Heating the mixture too fast can cause clumps and foaming to form later on.
7. Allow gummy mixture to set in a cup
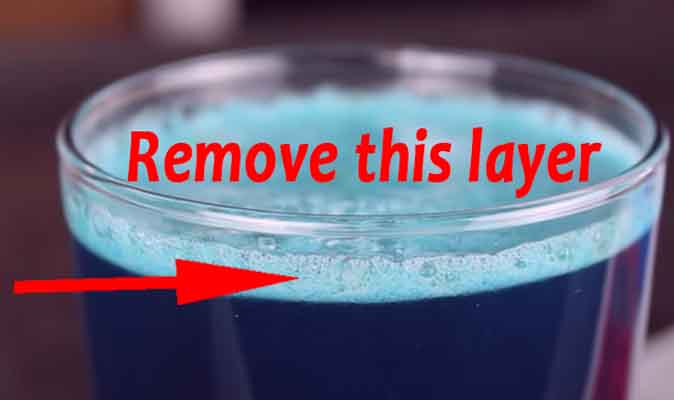
Using a heat-resistant glass cup, pour the gummy mixture in. Let it sit for 10-15 minutes. Most of the clumps, bubbles, and foaming should rise to the top of the cup.
Then simply scrape off the foam before using this mixture to pour into your molds. Don’t try to pour directly from this cup into molds unless you want to make a mess!
Related Questions
How to hide bubbles in gummy candy
Maybe your gummy candy has already set, and there is a foamy appearance on one side of it. There are multiple ways to hide this:
1. Coat the candy in sugar and/or citric acid for sourness.
When using citric acid, be careful about using too much. Citric acid is water-soluble and can pull moisture out of the gummies, making them wet and sticky. A good ratio of coating with sugar and citric acid is 3:1. 3 teaspoons of sugar per 1 teaspoon of citric acid.
2. Present the gummies with the foamy side down.
3. After the gummy has set, take a knife and simply slice off the foamy part.
How do you increase the shelf life of a gummy bear?
Best practices call for storing the gummies in a cool, dark, and dry location in an airtight container.
Optional: After 24 hours of sitting in a silicone mold and pulling the gummies out, completely dust the gummy bears in starch and immediately brush off the excess. Any earlier can cause the starch to clump on the gummies’ exterior.
Additionally, you could also allow the gummies to dry under a fan for another 12-24 hours. These two steps help keep gummies shelf stable (when packaged properly).
How high can you heat gelatin to set gummies?
For firmer gummies, you’ll want to use even more gelatin than a recipe calls for. You also want to boil away more of the water.
However, heating the gummy mixture past 212°F can lower the gelatin’s gelling properties.